

A mid taper fade for straight hair shortens the hair gradually around the temples, sideburns, and nape, with the blend starting about halfway up the sideburn curve. The rest of the sides keep their weight. The result is a clean, modern look that’s not too bold and not too plain, and straight hair shows the blend better than almost any other texture.
This guide covers 25 styles, how a taper differs from a fade, and how face shapes and hair density change the plan. You’ll also get a barber script, styling steps, and upkeep advice. Guard numbers (usually a number 1 to number 4 guard) and touch-up timing are starting points, not rules. Barbers and hair growth vary, so use reference photos and agree on details before the clippers come out.
What Is a Mid Taper Fade for Straight Hair?
It’s a haircut where the sides and back are tapered at a middle height. “Mid” describes where the blend begins: around temple level, between a low taper near the ear and a high taper above the temples. “Taper” means the hair shortens gradually instead of abruptly. “Fade” means the shortening blends seamlessly, often down to a very short guard length or skin.
In practice, a barber usually starts at a number 1 guard (sometimes shorter) and blends up through a number 2 and number 3 into the longer hair that connects to the top. Terminology varies from shop to shop, so agree on the placement visually rather than by name alone.
What Makes a Mid Taper Different From a Mid Fade?
The difference is coverage. A mid taper is localized: the shortened area sits at the temples, sideburns, and nape, and the rest of the sides stay full. A mid fade is an all-around blend that runs across the sides and back, so there’s little weight left below the blend line.
Height is a separate decision from depth. Depth is how short the shortest point goes, such as a shadow finish, a guard length, or skin. A mid taper can finish at a guard or at skin, and so can a mid fade. As they grow out, a taper tends to soften at the edges, while a fade can show a visible band as the sides fill back in.
How Straight Hair Changes the Finished Look
Straight hair has no curl pattern to hide anything. Blend lines read clearly, weight corners are visible, and the neckline shows exactly as cut. That’s why precision matters: an uneven blend is obvious on straight hair.
The top falls in its natural growth direction, so cowlicks and strong natural parts matter more. Density changes the picture too. Fine, sparse hair can show scalp at the temples. Dense, coarse hair can push the sides outward unless the barber removes internal weight. Either way, the cutting direction and the silhouette depend on your hair, not just the cut’s name.
Why a Mid Taper Fade Works So Well for Straight Hair
Straight hair gives a mid taper a clean canvas. Transitions look crisp, the finish looks polished, and you can change the top without changing the sides. Here’s what that means day to day.
Clean, Sharp Blending and Defined Transitions
On straight hair, every step of the guard progression is visible, from the number 1 at the base to the number 3 or number 4 where it joins the top. When it’s done well, you see a smooth gradient with no harsh line at the temples, sideburns, or neckline. When it’s rushed, you see it from across the room. A mid taper puts clipper work and barber skill on display, which is a good reason to choose your barber carefully.
Natural Contrast and a Sleek Finish
A mid taper gives moderate contrast between the top and sides. It’s stronger than a low taper and less dramatic than a high taper, so it looks refined without feeling overdone. Straight strands lie flat, which makes a smooth, professional finish easy. Want less shine? Use a matte product. Want a defined outline? Keep the edges tidy.
Versatility for Different Hair Lengths and Styles
The sides stay constant while the top decides the style. A short top gives you a crop or crew cut. Medium length opens up a quiff, side part, comb over, or slick back. A longer top can become a pompadour, curtains, or a blowout. Small product changes can take one cut from a work look to a weekend look.
Easier Styling and Predictable Grow-Out
Straight hair grows in a predictable downward direction, so a mid taper tends to grow out evenly. The gradient softens over time instead of turning into an obvious band, and the shape usually stays tidy for a couple of weeks. Daily effort is low: a few minutes and a small amount of product. Because the weight stays on the sides, the regrowth looks forgiving compared with a full fade.
Mid Taper vs Low Taper vs High Taper vs Mid Fade
The main difference is where the blend sits on the sideburn curve, and how far around the head it goes. A low taper starts in the lower third, near the ear. A mid taper starts in the middle, at temple level. A high taper starts in the upper third, above the temples. A mid fade blends at the same middle height but wraps all the way around the head.
Barbers don’t always use these terms the same way. In general, a fade is a type of taper that takes the hair down much shorter, so always confirm the height and depth visually. Mark the height on your own head with a fingertip before the cut, then choose by how much contrast you want.
| Cut | Blend starts | Contrast | Weight on the sides | Typical touch-up* | Good for |
| Low taper | Just above the ear | Subtle | Kept | 3 to 4 weeks | Conservative or office settings, thin hair |
| Mid taper | Temple level | Moderate | Kept | 2 to 3 weeks | A balanced first taper |
| High taper | Above the temples | Very bold | Kept | 1 to 2 weeks | Thick hair, statement looks |
| Mid fade | Temple level, all around | Even, moderate to bold | Little below the blend | 2 to 3 weeks | An even gradient |
*Estimates. Hair growth and the sharpness you want change the interval.
Mid Taper Fade vs Low Taper Fade
The mid taper starts at the temples and the low taper starts just above the ear, so the mid gives stronger contrast and the low gives a softer, subtler blend. A low taper leaves less fade exposed, which means less scalp show-through on thin hair and a more conservative, office-friendly look. It often stays tidy a bit longer, around 3 to 4 weeks. Both work on straight hair. The choice depends on how bold you want the cut to look.
Mid Taper Fade vs High Taper Fade
A high taper starts above the temples, creating a sharp band of contrast that suits thick straight hair and fashion-forward styles. It also exposes more scalp and looks overgrown sooner. Many people need touch-ups every 1 to 2 weeks to keep it crisp. The mid taper is the safer middle ground: noticeable contrast, slower grow-out, and fewer surprises.
Mid Taper Fade vs Mid Fade
Both start at the same height, but they cover different areas. The mid taper is a localized blend at the temples, sideburns, and nape, with full sides and back above it. The mid fade is an all-around fade, so the weight above the ears is removed too. Choose the taper for subtlety and the fade for an even, higher-contrast gradient. Also expect a mid fade to show a visible band and grow out faster.
25 Best Mid Taper Fade Styles for Straight Hair
Each style below changes the top, the finish, or a real detail of the cut. The sides stay a mid taper throughout.
1. Classic Mid Taper Fade

The safe first mid taper. The top is short to medium and combed naturally, the temples and neckline blend cleanly, and the hairline stays neat. It sharpens facial features, takes a minute or two to style, and works from work to weekend.
2. Textured Fringe Mid Taper Fade
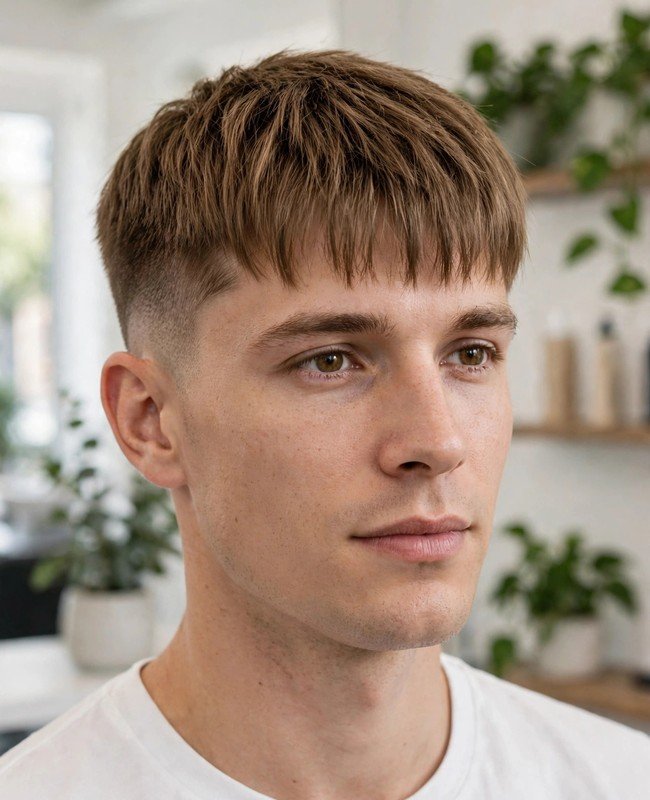
The top is a little longer than a crop, and the ends are point-cut so the front moves instead of sitting like a block. Style it on damp hair with sea salt spray, blow-dry forward, and finish with a little light clay on the tips. It suits fine to medium hair that collapses easily. Once the fringe passes the eyebrows, it stops separating well.
3. Messy Fringe Mid Taper Fade

This is the relaxed take. The top has loose, tousled texture and the sides stay tidy. A pea-size amount of matte clay on dry hair, ruffled with your fingers, is enough. Then press the fringe into place. It adds movement, softens the forehead, and works best on medium-density straight hair.
4. Mid-Blowout Taper Fade
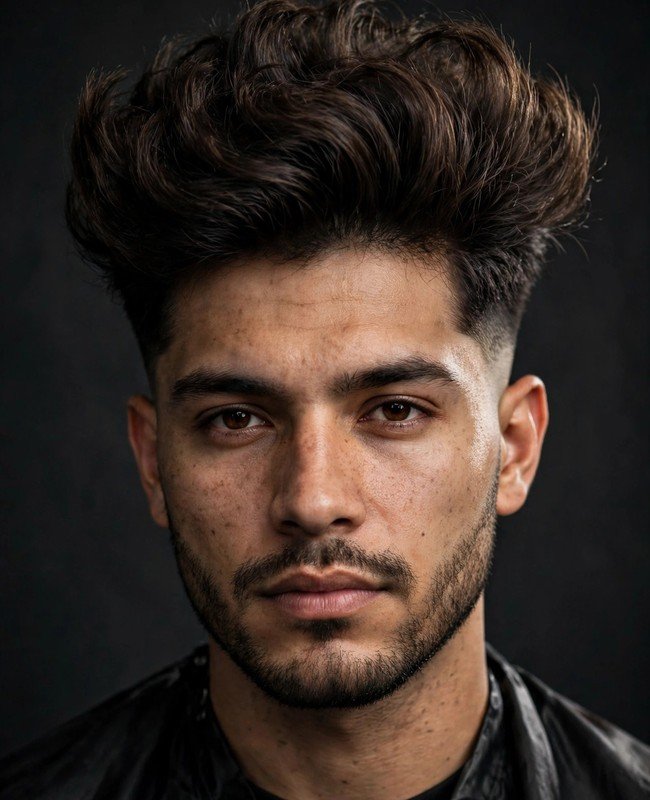
The blowout has airy lift on top and clean sides. Start with volumizing mousse on damp hair, then blow-dry upward with a vent brush or round brush and lock it with light cream. It’s good for fine or flat straight hair, though it’s also the most demanding style on this list because it needs a dryer most days.
5. Curtain Bangs Mid Taper Fade

Medium-length straight hair splits down the center and falls to both sides, framing the face. Blow-dry with a middle part and smooth with light cream. Straight hair hangs where you put it, but a hairline whorl can take weeks to train. It’s softer and low-structure, and it suits longer faces.
6. Slick Back Mid Taper Fade

A polished top brushed straight back over a taper around the temples. It works for medium to thick straight hair. Brush it back while damp, blow-dry with a round brush, and finish with a medium-hold cream or matte paste. Everything travels backward, which makes it a good formal option.
7. Comb-Over Mid Taper Fade

A soft side part blends into the fade for office-ready elegance. Part the hair when damp, blow-dry the part in place, and finish with lightweight cream. It works best on fine or medium hair with a defined natural part. If you part against the growth direction, expect it to separate by midday.
8. Hard Part Mid Taper Fade
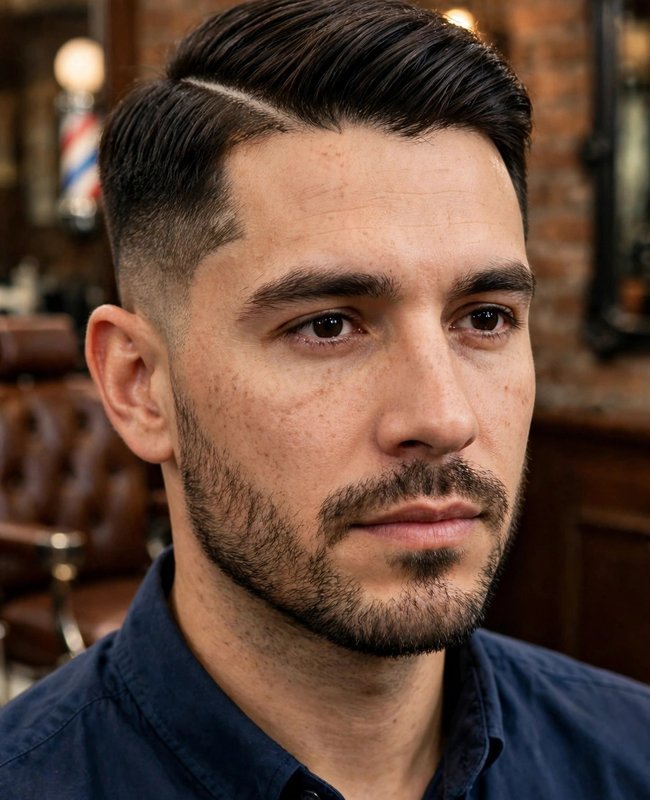
A single razor line is shaved into the side to mark the part. It adds a crisp, deliberate detail to a comb-over base. Use matte clay for strong hold without crunch. The taper blends around the line cleanly, and you’ll want regular touch-ups to keep it sharp.
9. French Crop Mid Taper Fade
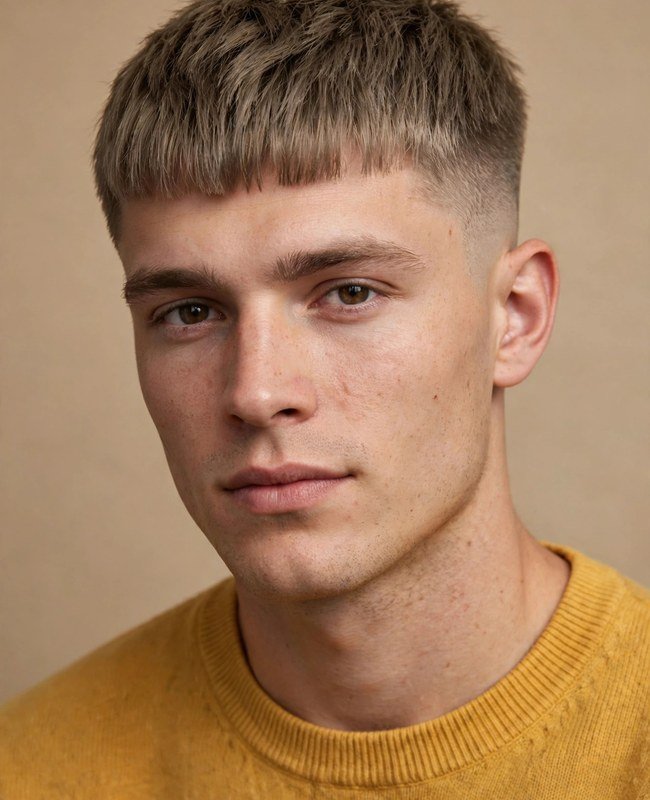
A short, point-cut top is worn forward over the forehead, with a blunt or softened fringe. The taper keeps the temples clear. It suits dense or coarse hair and takes under a minute to style, because the texture is cut in, not added by product. A strong front cowlick will fight it.
10. Pompadour Mid Taper Fade

A lifted front with height and structure, swept up and back. The clean tapered sides keep it balanced. You need front length to spare, since the height comes from volume, not shaved sides. Use mousse first, lift with a round brush, and finish with medium-hold cream or firm paste. It often flatters oval or square faces.
11. Disconnected Mid Taper Fade
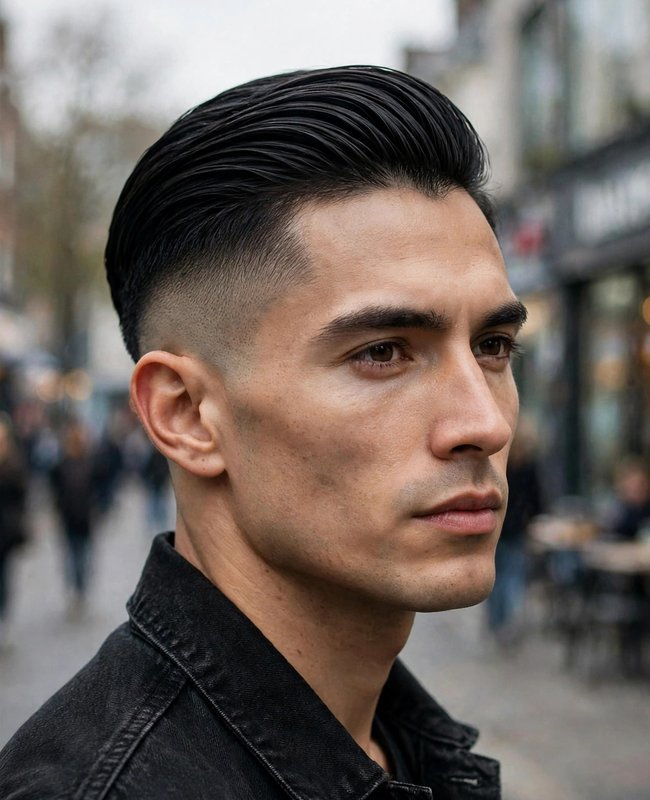
The top keeps its length while the sides taper short, leaving a deliberate gap with no blend at the join. It’s a bold, high-impact look with a sharp silhouette. The longer top can be styled as a fringe, slick back, or forward styling.
12. Crew Cut Mid Taper Fade

Simple and low-maintenance. The top is short with slight height at the front, and the sides blend from temple to neckline. It works for fine to medium straight hair and suits professional or athletic lifestyles. Use a dab of matte clay or leave it natural. It takes under a minute, but it shows your head shape.
13. Quiff Mid Taper Fade
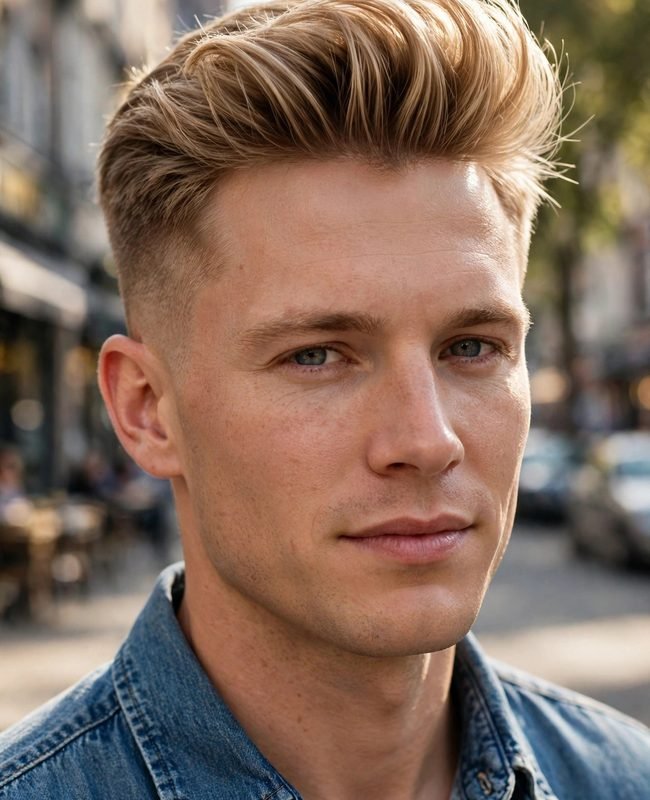
Subtle height at the front, clean polish at the sides. Length increases toward the front, and the hair lifts up and back. Use mousse, blow-dry up and back, and add a touch of clay. It suits medium to dense hair and most face shapes. The height also helps elongate a round face.
14. Ivy League Mid Taper Fade

Short on top but with enough length to part, combed to the side with a neat finish. It’s office appropriate, low maintenance, and timeless. A little light cream is all it needs. It’s similar to a side part, but the top is generally shorter and more tailored.
15. Side Part Mid Taper Fade

The top combs across in the direction the hair already grows, and the taper cleans up the temple. It comes in natural and hard-part versions. Blow-dry across the part and finish with light cream or paste. A part against the growth direction tends to separate by midday.
16. Faux Hawk Mid Taper Fade

The center strip is raised, with height through the middle and tapered sides. Pinch and lift with matte clay for structured peaks. It’s bold but wearable, adds volume at the crown, and often works on diamond faces.
17. Spiky Top Mid Taper Fade

A short to medium top styled into controlled spikes. Work matte clay through dry hair and pinch upward. Texture powder can add grip. It adds height for round faces and is also good on square faces. Use a light product amount or the spikes will clump.
18. Caesar Cut Mid Taper Fade
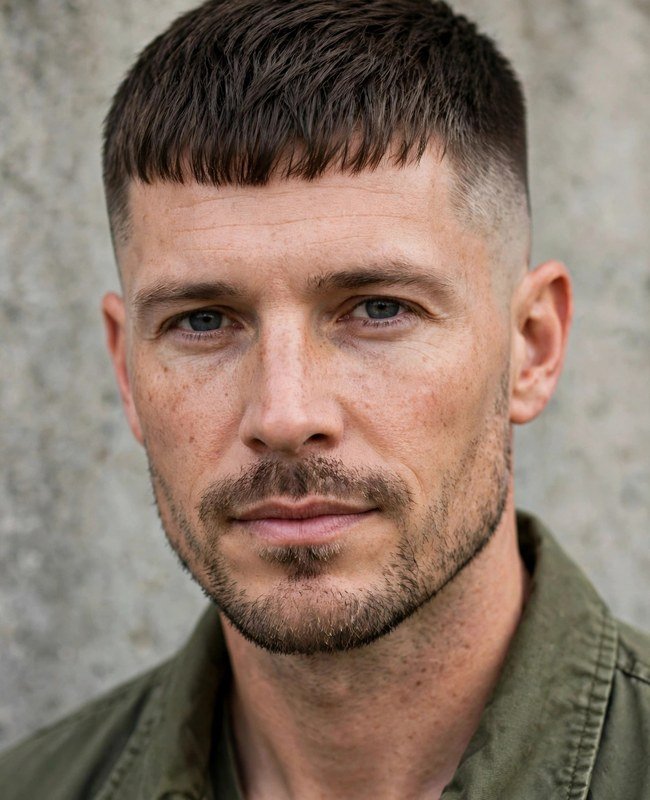
A short, horizontal fringe on an even-length top. It offers forehead coverage and is often chosen for receding hairlines. Forward styling and a matte finish keep it simple. It’s low maintenance and part of the short crop family.
19. Mid Taper Fade With Beard
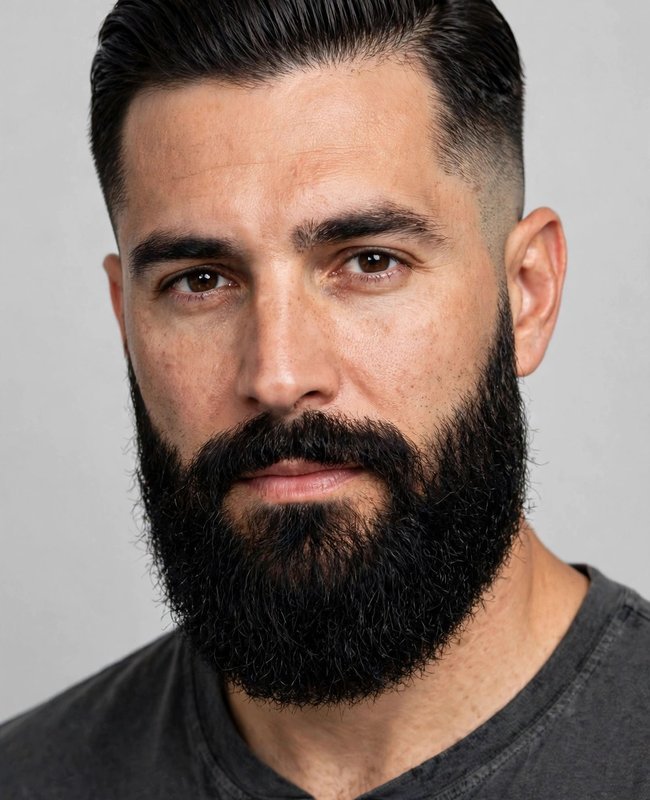
The fade blends into the beard at the sideburn, neckline, and upper perimeter, with no harsh gap. It works with stubble, a short beard, or medium beard lengths. The beard shape follows the taper, which helps define the jawline. Ask your barber to blend both in one visit.
20. Long Top Mid Taper Fade

With about 4 to 6 inches on top, the taper survives long hair because the sides keep their weight. The top can become a fringe, comb over, slick back, or blowout. Layering respects the natural part, and internal texture stops it from becoming a solid block. It takes more daily styling time.
21. Modern Mullet Mid Taper Fade

Length is kept at the back while the sides are tapered tidy. The back is the daring part. Use sea salt spray for grit and direct the ends with a dryer. It often suits diamond or triangular faces, and it needs regular trims to keep the shape deliberate.
22. Buzz Cut Mid Taper Fade

A close-cropped top with a perfectly blended fade. It sharpens every feature and needs no styling product. It isn’t zero maintenance: the fade needs attention every 2 to 3 weeks, and a lightweight moisturizer helps scalp care. It takes under a minute but shows your head shape.
23. Brushed-Up Mid Taper Fade

Fresh, effortless lift with subtle volume at the front and tight sides. Length graduates to a longer front. Blow-dry upward with your fingers or a vent brush, then use matte clay for dry texture. It suits fine to medium straight hair and square or oval faces.
24. Side Swept Mid Taper Fade

A calmer alternative: simple, sleek, and understated. Blow-dry sideways and finish with light cream or paste. It’s a good fit for professional settings and oval faces. The brushed-back version is just as easy.
25. Messy Top Mid Taper Fade

Controlled imperfection over a clean fade. Use salt spray, scrunch while blow-drying, and add a small touch of clay for separation. It suits medium-density hair and gives oblong faces width, not height.
Which Face Shape Suits a Mid Taper Fade Best?
All face shapes can suit a mid taper, so treat face shape as a styling guide, not a rule. The top is what changes proportions: height on top lengthens the face, and width at the sides widens it. Check the side profile and crown in a photo, and let your barber adjust the top to match.
Mid Taper Fade for Oval Faces
Oval faces have balanced proportions, so almost any top works. A side swept, brushed-back, textured, or quiff style all work well, and you can pick based on how much daily effort you want.
Mid Taper Fade for Round Faces
Height on top helps elongate the face. Try a textured fringe, quiff, blowout, or spiky top with volume at the crown. Keep the sides controlled and avoid flat, wide tops.
Mid Taper Fade for Square Faces
A strong jawline pairs well with a comb over, side part, or crew cut. A textured fringe can soften the edges, while a hard part keeps the look sharp and polished.
Mid Taper Fade for Heart-Shaped Faces
Go for fullness at the front to balance a narrower chin. A curtain bangs or messy fringe style softens a wide forehead. Avoid heavy height, and keep the sides clean.
Mid Taper Fade for Diamond Faces
Width at the crown and volume up top balance wide cheekbones. A faux hawk, side part, quiff, pompadour, or modern mullet adds structure against a narrow forehead and chin.
Mid Taper Fade for Oblong and Rectangular Faces
Focus on width, not height. A French crop, crew cut, messy top, or curtain bangs helps level out proportions. A forward fringe breaks up length, and added height on top can make the face look longer.
Mid Taper Fade for Triangular Faces
Volume up top balances a wider jaw and narrower forehead. Textured tops and fringe options work, and you should add height carefully so the top doesn’t look overdone.
Mid Taper Fade for Thin vs Thick Straight Hair
Density is how many hairs you have. Strand thickness is how wide each hair is. They’re not the same: you can have fine and sparse hair, fine and dense hair, or coarse and dense hair. Each one needs a different fix. Thin hair risks scalp exposure, while thick hair risks bulk. A barber should adjust guard choice, top length, fade depth, and product for your hair.
How to Get a Mid Taper Fade With Thin or Fine Straight Hair
Scalp show-through is the main risk. Ask for a minimum number 1 guard at the base, never a skin fade, and a softer, more gradual taper. Keep at least 3 to 4 inches on top for coverage, and skip the lineup. Textured and messy fringes create the illusion of thickness. Use volumizing mousse and texture powder, and keep products light. Fine hair shows the blend lines, so ask for a gradual one.
How to Get a Mid Taper Fade With Thick Straight Hair
Thick hair holds shape the longest and shows the boldest fade lines. The challenge is bulk. Ask the barber to use texturizing scissors or point-cutting on top and remove internal weight. Don’t raise the taper to fix bulk, because dense hair can still project outward above it. Firm paste or clay and a dryer give strong control.
How to Ask Your Barber for a Mid Taper Fade on Straight Hair

The clearest request covers height, depth, and top style, in that order. A sample script: “Mid taper at the temples, number 1 at the base blending up to a number 3, sides left full above that, about three inches on top, textured and swept forward.” A full cut commonly takes 30 to 45 minutes, so there’s time for a quick consultation.
Decide Your Preferred Top Length and Hairstyle Before Booking
Pick the top style first, because style decides the length. A crop needs a few inches at the front, a quiff needs enough length to hold direction, a side part needs length to comb across, and flow needs more. There is no single required length. Be honest about the morning minutes you’ll spend, and flag cowlicks and crown growth patterns before the cut.
Choose the Taper Height, Depth, and Desired Shortness
These are two separate requests. Height is where the blend sits on the sideburn curve. Depth is how short the shortest point goes: shadow, guard length, or skin. Bulk is a third dial, and many people keep roughly a guard 2 to 3 of weight on the sides. Confirm five things before the first pass: height, depth, neckline (natural or squared), lineup or natural hairline, and where the blend connects. Ask the barber to mark the height on your head, because hair can’t go back on.
Decide How Much Length to Keep Around the Sides and Back
A taper stays at the temples and nape. Ask whether it carries around, and keep most of the sides full. That weight is what separates a taper from a fade. Describe the top by style instead of inches, and ask for graduated length above the blend. If bulk is wrong, the sides project, so mention internal weight removal on dense hair.
Bring Reference Photos and Explain Your Desired Finish
A photo beats the name of the cut, since shops use terms differently. Bring two to three photos, ideally from the front, side, back, and above, of someone with similar hair. Save them before the appointment and point at the area you mean. Add part direction, finish (matte or polished), and one maintainable top style so there’s no guesswork.
Questions to Ask Your Barber Before the Cut
• Do you have experience with straight hair?
• What guard progression will you use for my thickness?
• What top length works for my face shape?
• How often should I touch it up?
• What product do you recommend?
A good barber answers clearly and can describe the blend height on your head.
Barber Red Flags to Watch Out For
• Skips the consultation or starts clipping immediately.
• Rushes the blending or can’t describe the guard progression.
• Doesn’t ask about your reference photo, density, or routine.
• Ignores growth patterns or cowlicks.
• Pushes a skin fade on thin hair.
• Doesn’t repeat back what they heard.
If several of these show up, choose another barber.
How to Style a Mid Taper Fade for Straight Hair Step by Step
Hair takes shape while it dries, so dry it in the direction of the style and add product last. The whole routine takes a few minutes.
Step 1: Wash and Prepare Your Hair
Wash, and base how often you shampoo on how oily your scalp is. Then towel dry gently. Blot with a towel or t-shirt and never rub. Let the hair dry a little before combing, and comb the ends first. Aim for damp, not dripping, roughly 70 to 80 percent dry. Partial air-drying also reduces how often you need the dryer.
Step 2: Apply a Pre-Styling Product
Use volumizing mousse for fine hair, lightweight cream for thick hair, or texture or sea salt spray for grip. A dime to quarter size is plenty. Work it from roots to ends with your fingers. Avoid heavy gels at this stage.
Step 3: Blow-Dry for Volume and Direction
Use a heat protectant first. Hold the dryer about 6 inches away on low to medium heat and dry in the style direction: forward for a crop, up and back for a quiff, across for a part. A vent brush or round brush with a rolling motion helps. Finish with a cold shot to lock the shape.
Step 4: Create Texture and Definition
Naturally flat straight hair needs help. Scrunch sea salt spray into damp hair, press texture powder into dry roots, or work matte clay through fully dry hair. Fingers separate the pieces and stop the top from becoming one solid block. Avoid petroleum-based products.
Step 5: Shape and Finish Your Hairstyle
Hair is easiest to shape while still warm, in roughly a 30 to 60 second window. Use a pea to dime size of finishing product with your fingertips, and less than you think you need. Check the part line, tidy the fringe, and smooth the top direction. A light finishing spray is optional.
Step 6: Adjust Your Style for Different Occasions
One cut can give four finishes by changing only the top. For work, keep it smooth and combed with a light pomade. For weekends, rough-dry with sea salt spray. For date night, add volume with matte clay. For formal events, slick it back with a medium-hold pomade or make a crisp side part.
Best Products for Mid Taper Fade on Straight Hair
Straight hair generally does best with light products in small amounts. Choose by hold level and finish (matte, natural, or shine), and by hair type. Avoid heavy gels and petroleum-based products, which can weigh hair down. A hybrid texture clay can be a good compromise if you want clay’s grip with a little more flexibility.
Matte Clay for Natural Texture and Hold
Matte clay gives strong hold with no shine. It adds grit and separation and controls bulk, so it’s popular for thick hair and flat hair that needs structure. Apply on fully dry hair with your fingers, using a pea to dime size. Over-applying looks heavy.
Styling Cream for a Soft, Sleek Finish
Cream gives light to medium hold and a natural finish. It suits all hair types, and a lightweight cream works well on thick hair. It tames flat strands without stiffness and supports comb overs and slick backs. Use it on damp or dry hair.
Sea Salt Spray for Added Texture
Sea salt spray adds grit and light hold for a casual, tousled finish. Apply on damp hair and scrunch while drying. It’s a good pre-styler for fine hair and fringes. The result is matte and lightweight.
Volumizing Mousse for Flat or Fine Hair
Mousse lifts hair at the roots without weight. Apply to damp hair, then blow-dry upward, ideally with a round brush. It’s the first step for volume on fine, flat hair and pairs well with quiffs and pompadours.
Pomade for Shine and Controlled Styling
Pomade gives medium to strong hold with shine, which suits slick backs, comb overs, and polished parts. Use it sparingly. A light pomade works for professional styling and a medium hold for formal events. Heavy, petroleum-based pomades can weigh hair down if overused.
Texture Powder for Lift and Volume
Powder adds grit and light hold with a matte finish. Press it into dry roots for instant volume and the illusion of thickness on fine hair. It’s also a quick second-day refresh, and it pairs well with mousse.
Mid Taper Fade Maintenance and Growth Timeline
Hair grows about half an inch per month on average, which works out to roughly 3/8 inch in three weeks. Individual growth varies, and the rate tends to slow with age. With a mid taper, the edges soften first, then the blend closes up, and then the sides begin to project. Your ideal interval depends on your growth speed and how sharp you want the cut.
How Often Should You Get a Mid Taper Fade Touched Up?
Most people land on every 2 to 3 weeks. Every 2 weeks gives maximum sharpness, and 3 to 4 weeks is a realistic minimum. After 4 weeks, you’ll likely need a full re-cut. Some barbers estimate a taper can look clean for 4 to 5 weeks, and these estimates vary. By comparison, a skin fade often needs attention at 2 to 3 weeks. Book your next appointment before you leave, and adjust after you learn your own pace.
Week-by-Week Mid Taper Fade Growth Timeline
• Week 1: Peak sharpness. The lineup and blend are at their most visible.
• Week 2: Still sharp. The top has grown about 1/8 inch.
• Week 3: Growth is noticeable and the gradient starts blurring. Sideburn and nape edges soften. Plan the touch-up now.
• Week 4: Looks overgrown, and a full re-cut is usually needed.
• Weeks 4 to 6: The blend closes up and the sides begin to project.
Photograph your head weekly to learn your own interval.
How to Maintain Your Mid Taper Fade Between Barber Visits
Keep it simple. Use a trimmer for neckline cleanup only, and never trim the fade line yourself. Be conservative at the nape and sideburns, and clean up every 7 to 14 days if you like. Keep daily styling consistent, use clarifying shampoo about once a week to clear buildup, and try a silk or satin pillowcase to reduce friction.
Common Mid Taper Fade Mistakes to Avoid
Most mid taper problems come from poor communication or the wrong match for your hair. These are the ones worth avoiding.
Taking the Taper Too High
When the fade starts too high, you lose the mid balance and change the whole look. Agree on the height visually first, and have the barber mark it on your head. Mid means the middle of the sideburn curve. A higher taper can’t be undone without regrowth, so start conservative, because hair can always come off later.
Cutting Straight Hair Too Short on Top
Length decides the style. Thin hair generally needs 3 to 4 inches on top, and fringes and quiffs need front length. A top that’s too short increases scalp exposure, limits your styling options, and makes you wait for regrowth. Describe the top by style, and keep enough length to style it.
Leaving Harsh Lines or Uneven Blending
Straight hair shows every line, and there’s no curl to hide a blend. Rushed blending is a red flag. Check the blend in the mirror, including the side profile and neckline, and ask for fixes at the same visit. A good guard progression produces a seamless gradient with no visible band.
Ignoring Hair Density, Growth Patterns, and Cowlicks
A crown cowlick or a front cowlick can decide what the fringe does, and a strong natural part can fight a different one. Flag these before the cut. Length can override a cowlick, and density changes the guard choice. On thick hair, the sides stick out as hair grows unless internal weight is removed.
Using Too Much Styling Product
Straight hair is easy to weigh down. Heavy gels stiffen it and kill volume, and petroleum-based products can look greasy and flat. Start with a pea to dime size on dry hair, apply with fingertips, and add more only if needed. If buildup occurs, a clarifying shampoo helps.
Frequently Asked Questions About Mid Taper Fade for Straight Hair
Is a Mid Taper Good for Straight Hair?
Yes. Straight hair shows clean lines and contrast clearly, so a mid taper looks sharp, sleek, and balanced. It’s not too bold, grows out predictably, and works with many top styles. It suits most men, though density and cowlicks still affect the result.
Can I Get a Taper Fade With Straight Hair?
Yes, straight hair works well. A taper adds contrast and structure without fighting your natural flow. It starts around the temples and blends into the neckline. Fine hair needs a guard minimum at the base, and thick hair holds the shape longest. Talk it through with your barber first, and bring a photo.
Which Taper Fade Is Best for Straight Hair?
It depends on the contrast you want. The mid taper is the balanced middle choice, a low taper is more conservative, a high taper is bolder, and a mid fade gives an even gradient. Face shape, density, office needs, and how often you’ll visit the barber all matter. If you’re new to tapers, starting at mid height is a reasonable trial.
How Often Should I Get a Mid Taper Fade Touched Up?
Every 2 to 3 weeks is a common interval for keeping the lines sharp. Some people stretch to 3 to 4 weeks as softening sets in. The edges go first and the top lasts longer. Growth speed and how sharp you want the cut decide your personal interval.
Can a Mid Taper Fade Work for Thin Straight Hair?
Yes, with adjustments. Ask for a number 1 guard minimum at the base, not skin, and keep 3 to 4 inches on top. A gradual blend, no lineup, a textured or messy fringe, and light products like mousse and texture powder create a fuller look. Mention any thinning honestly so the barber can plan around it.
Will a Mid Taper Fade Look Good as It Grows Out?
Generally, yes. It stays clean for around 2 to 3 weeks, and then the gradient softens instead of forming a harsh band. Downward growth stays predictable, so grow-out is forgiving compared with a full fade. By weeks 4 to 6 the sides begin to project and a full re-cut helps. Plan your touch-up around week 3.

Andrew Ethan is a men’s grooming writer with experience covering haircuts, hairstyles, hair trends, and hair care. He researches popular men’s styles, including fades, tapers, curls, mullets, and classic cuts. Andrew shares practical styling tips and easy-to-follow advice to help readers choose modern hairstyles that suit their look and lifestyle.